


Photo courtesy of houzz.com
I saw this photo on houzz.com of these silhouettes. I loved the bright colors and oversized white frames. I knew with a little effort I could figure out how to make these for my own home.
The first step involves taking a picture of the person or persons you want a silhouette of. You need to have them stand in front of as white and as plain a background you can find to create contrast between the background and subject. The first step is really the hardest because it involves getting your kids to hold perfectly still. The big kids were super put-out to have to stand in front of the white wall and pose for a picture. Good thing pre-teen irritability does not translate into silhouettes, although you can see the thinly veiled disdain in the pictures.


I did some research online and found the easiest way to turn these into digital silhouettes was in Photoshop. I have the entry level version, Elements, but it was just fine.
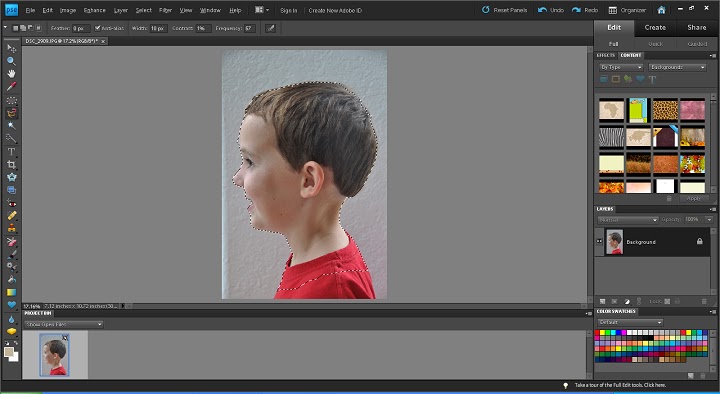
You open the files into Photoshop and use the "Magnetic Lasso Tool". You can see it highlighted on the menu in the left side of the screen. The lasso tool "sticks" to the contrasted image. You can click the mouse key to add dots and the delete key to remove them. Then you simply connect the dots.

When the dots are connected it shows the selected image in a black and white outline bar.
You then open the Hue/Saturation window which is in Enhance/Adjust Color/Adjust Hue/Saturation. You select -100 (all the way to the left) on the third option down, "Lightness" which will make your silhouette black. If you want to simply use a black silhouette, you can copy and paste into any program, or open another Photoshop page and you can print it.


I wanted the silhouette the other direction so I flipped it horizontally.


I saw this photo on houzz.com of these silhouettes. I loved the bright colors and oversized white frames. I knew with a little effort I could figure out how to make these for my own home.
The first step involves taking a picture of the person or persons you want a silhouette of. You need to have them stand in front of as white and as plain a background you can find to create contrast between the background and subject. The first step is really the hardest because it involves getting your kids to hold perfectly still. The big kids were super put-out to have to stand in front of the white wall and pose for a picture. Good thing pre-teen irritability does not translate into silhouettes, although you can see the thinly veiled disdain in the pictures.


Case was actually happy to get some attention and have his picture taken. He is the only silhouette I have with a smile.

Addison was a whole different story at three years old. She kept looking at the camera. "No, straight ahead!" I would say. She just didn't get why I wouldn't want to take her face. So I kept getting photos like this one--kind of a 3/4 shot that distorts your face:

And then reluctance, tears, and then finally......submission to the inevitable. Mom was going to get this picture.


You open the files into Photoshop and use the "Magnetic Lasso Tool". You can see it highlighted on the menu in the left side of the screen. The lasso tool "sticks" to the contrasted image. You can click the mouse key to add dots and the delete key to remove them. Then you simply connect the dots.
When the dots are connected it shows the selected image in a black and white outline bar.
You then open the Hue/Saturation window which is in Enhance/Adjust Color/Adjust Hue/Saturation. You select -100 (all the way to the left) on the third option down, "Lightness" which will make your silhouette black. If you want to simply use a black silhouette, you can copy and paste into any program, or open another Photoshop page and you can print it.
I created a new Photoshop page and copied and pasted the silhouette into it.
I created an outline of the image by painting (with the paint bucket) the image white and adding a stroke, which you can do by selecting Edit/Stroke/Outline Selection, or under Layer/Layer Style/Style Settings and select Stroke.
I wanted the silhouette the other direction so I flipped it horizontally.
And there you have an outlined silhouette! For my gallery, I wanted them large so I copied the image into Adobe Illustrator (which I am much more efficient at then Photoshop, sorry) and enlarged it, printed it on cardstock in tiles (the image is larger than 8.5 x 11 so it prints on multiple pages), taped them together and cut it out.

Then I traced the cut-out onto oversized sheets of artist paper, and painted them in using these Martha Stewart paints and generic paintbrushes from Joanns:

Don't forget the white paint in case you mess up! I added their names underneath and then framed them in oversized square frames from Ikea, and they are now hanging on my family room wall. I love them! And they were relatively easy to do.


You would never know from the silhouettes how put-out and sad (in Addie's case) my kids were to have their picture taken. Though you'll always see Case's smile in his sweet little parted lips.


I love that their personalities show so much in even in silhouettes. And Addie's darling little bow, so feminine.
ReplyDeleteLove this!!!! You Rock I need to do this!
ReplyDelete